この章では、頂点シェーダに複数のデータを渡す実装を学びます。ほとんど新しい知識はなく、今まで学んだことの応用なのですが、バインディングとアトリビュートについては混乱を来たす面も多いかと思うので例を挙げて丁寧に解説したいと思います。
いちいち全てのコードを書くのは煩雑なので、
- 頂点データの定義
- デスクリプションを指定する部分
- バッファをバインドする部分
- シェーダ
の4点に絞ってコードを書いていきます。
復習: 頂点の座標のみを渡す
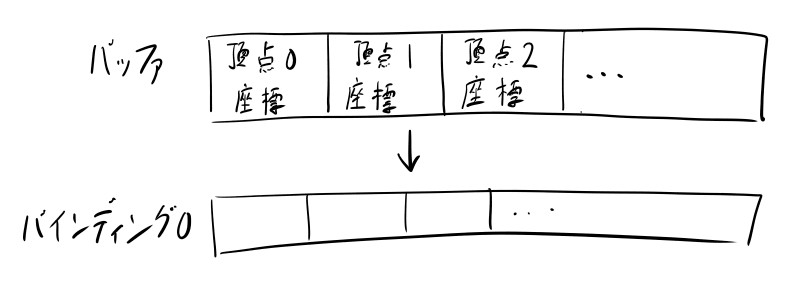
前回は頂点座標のデータをこのような形で渡していました。
// 頂点データの定義
struct Vertex {
    float x, y;
};

// この配列のデータをバッファvertexBufにコピー
std::vector<Vertex> vertices = { /* ... */ }
// デスクリプション指定
vk::VertexInputBindingDescription vertexBindingDescription[1];
vertexBindingDescription[0].binding = 0;
vertexBindingDescription[0].stride = sizeof(Vertex);
vertexBindingDescription[0].inputRate = vk::VertexInputRate::eVertex;
vk::VertexInputAttributeDescription vertexInputDescription[1];
vertexInputDescription[0].binding = 0;
vertexInputDescription[0].location = 0;
vertexInputDescription[0].format = vk::Format::eR32G32Sfloat;
vertexInputDescription[0].offset = 0;
vk::PipelineVertexInputStateCreateInfo vertexInputInfo;
vertexInputInfo.vertexBindingDescriptionCount = std::size(vertexBindingDescription); // == 1
vertexInputInfo.pVertexBindingDescriptions = vertexBindingDescription;
vertexInputInfo.vertexAttributeDescriptionCount = std::size(vertexInputDescription); // == 1
vertexInputInfo.pVertexAttributeDescriptions = vertexInputDescription;// バッファのバインド
cmdBufs[0]->bindVertexBuffers(0, { vertexBuf.get() }, { 0 });// シェーダでの受け取り指定
layout(location = 0) in vec2 inPos;ざっと見て特に分からない部分がなければ先に進みましょう。
ベクトルを表す構造体の導入
後々のために2次元ベクトル、および3次元ベクトルを表す構造体を作っておきましょう。
struct Vec2 {
    float x, y;
};

struct Vec3 {
    float x, y, z;
};頂点に含める情報が増えたときのため、Vertex構造体をこのように書き直してみます。
struct Vertex {
    Vec2 pos;
};

std::vector<Vertex> vertices = {
    Vertex{ Vec2{  0.0f, -0.5f } },
    Vertex{ Vec2{  0.5f,  0.5f } },
    Vertex{ Vec2{ -0.5f,  0.5f } },
};
これでも特に動作に変わりはありません。
様々な例
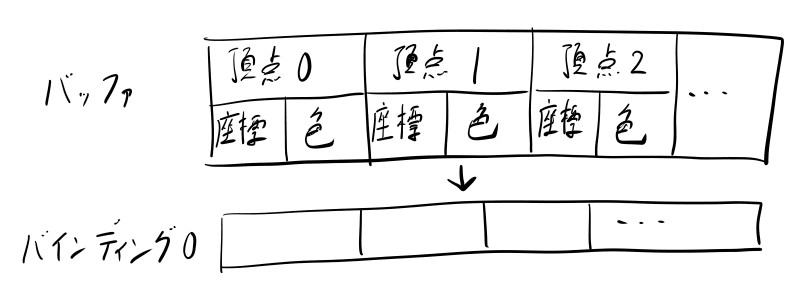
例1. 頂点の座標+色を渡す
次回実際これをやるので、しっかり理解しましょう。色データが3次元ベクトルなのはRGBの3原色という想定です。
// 頂点データの定義
struct Vertex {
    Vec2 pos;
    Vec3 color;
};

// この配列のデータをバッファvertexBufにコピー
std::vector<Vertex> vertices = { /* ... */ }
// デスクリプション指定
vk::VertexInputBindingDescription vertexBindingDescription[1];
vertexBindingDescription[0].binding = 0;
vertexBindingDescription[0].stride = sizeof(Vertex);
vertexBindingDescription[0].inputRate = vk::VertexInputRate::eVertex;
vk::VertexInputAttributeDescription vertexInputDescription[2];
vertexInputDescription[0].binding = 0;
vertexInputDescription[0].location = 0;
vertexInputDescription[0].format = vk::Format::eR32G32Sfloat;
vertexInputDescription[0].offset = offsetof(Vertex, pos);
vertexInputDescription[1].binding = 0;
vertexInputDescription[1].location = 1;
vertexInputDescription[1].format = vk::Format::eR32G32B32Sfloat;
vertexInputDescription[1].offset = offsetof(Vertex, color);
vk::PipelineVertexInputStateCreateInfo vertexInputInfo;
vertexInputInfo.vertexBindingDescriptionCount = std::size(vertexBindingDescription); // == 1
vertexInputInfo.pVertexBindingDescriptions = vertexBindingDescription;
vertexInputInfo.vertexAttributeDescriptionCount = std::size(vertexInputDescription); // == 2
vertexInputInfo.pVertexAttributeDescriptions = vertexInputDescription;// バッファのバインド
cmdBufs[0]->bindVertexBuffers(0, { vertexBuf.get() }, { 0 });// シェーダでの受け取り指定
layout(location = 0) in vec2 inPos;
layout(location = 1) in vec3 inColor;アトリビュートデスクリプションが2つに増えましたね。デスクリプションにおけるlocationの数字とシェーダにおけるlocationの数字が対応していることをしっかり確認してください。
そして offsetofという見慣れないものが出てきました。これは関数ではなくマクロで、構造体のあるメンバが先頭から何バイト目にあるかを求めるマクロです。
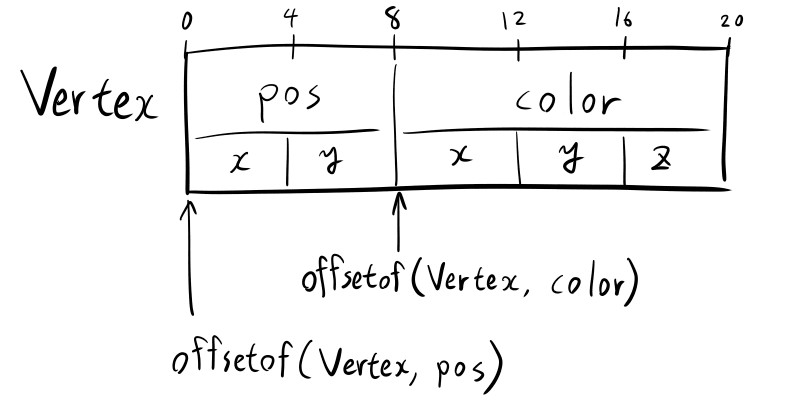
前回までで学んだようにアトリビュートデスクリプションのoffsetには、あるアトリビュートのデータを取り出すために頂点データの先頭から何バイト目を見れば良いかを指定します。offsetofマクロはそれを求めるのにピッタリというわけです。
大体Vertex構造体の先頭からpos,colorと並んでいて、posは4バイト×2で8バイトだろうというのは想像がつくので、
vertexInputDescription[0].binding = 0;
vertexInputDescription[0].location = 0;
vertexInputDescription[0].format = vk::Format::eR32G32Sfloat;
vertexInputDescription[0].offset = 0;   // 先頭から0バイト
vertexInputDescription[1].binding = 0;
vertexInputDescription[1].location = 1;
vertexInputDescription[1].format = vk::Format::eR32G32B32Sfloat;
vertexInputDescription[1].offset = 8; // 先頭から8バイトこのように書いても動作するわけですが、offsetofのような道具を使った方が意味が通るし分かりやすくて確実です。そちらを積極的に利用しましょう。
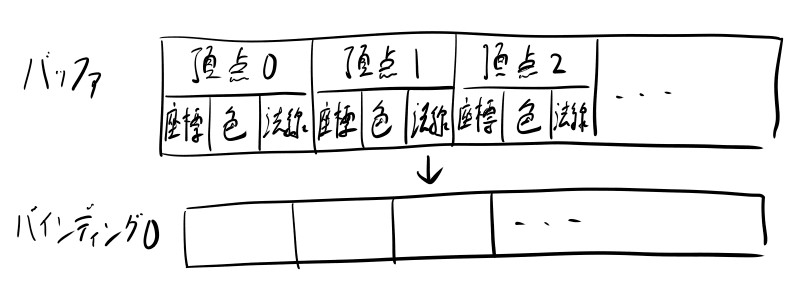
例2: 頂点の座標(3次元),頂点の色(RGB),頂点の法線ベクトルを渡す
// 頂点データの定義
struct Vertex {
    Vec3 pos;
    Vec3 color;
    Vec3 normal;
};

// この配列のデータをバッファvertexBufにコピー
std::vector<Vertex> vertices = { /* ... */ }
// デスクリプション指定
vk::VertexInputBindingDescription vertexBindingDescription[1];
vertexBindingDescription[0].binding = 0;
vertexBindingDescription[0].stride = sizeof(Vertex);
vertexBindingDescription[0].inputRate = vk::VertexInputRate::eVertex;
vk::VertexInputAttributeDescription vertexInputDescription[3];
vertexInputDescription[0].binding = 0;
vertexInputDescription[0].location = 0;
vertexInputDescription[0].format = vk::Format::eR32G32B32Sfloat;
vertexInputDescription[0].offset = offsetof(Vertex, pos);
vertexInputDescription[1].binding = 0;
vertexInputDescription[1].location = 1;
vertexInputDescription[1].format = vk::Format::eR32G32B32Sfloat;
vertexInputDescription[1].offset = offsetof(Vertex, color);
vertexInputDescription[2].binding = 0;
vertexInputDescription[2].location = 2;
vertexInputDescription[2].format = vk::Format::eR32G32B32Sfloat;
vertexInputDescription[2].offset = offsetof(Vertex, normal);
vk::PipelineVertexInputStateCreateInfo vertexInputInfo;
vertexInputInfo.vertexBindingDescriptionCount = std::size(vertexBindingDescription); // == 1
vertexInputInfo.pVertexBindingDescriptions = vertexBindingDescription;
vertexInputInfo.vertexAttributeDescriptionCount = std::size(vertexInputDescription); // == 3
vertexInputInfo.pVertexAttributeDescriptions = vertexInputDescription;// バッファのバインド
cmdBufs[0]->bindVertexBuffers(0, { vertexBuf.get() }, { 0 });// シェーダでの受け取り指定
layout(location = 0) in vec3 inPos;
layout(location = 1) in vec3 inColor;
layout(location = 2) in vec3 inNormal;だいぶ3DCGとして実用的な感じのコードです。
3つになってもあまり変わりませんね。
例3: 座標, 色, 法線をそれぞれ別のバッファ、別のバインディングで渡す
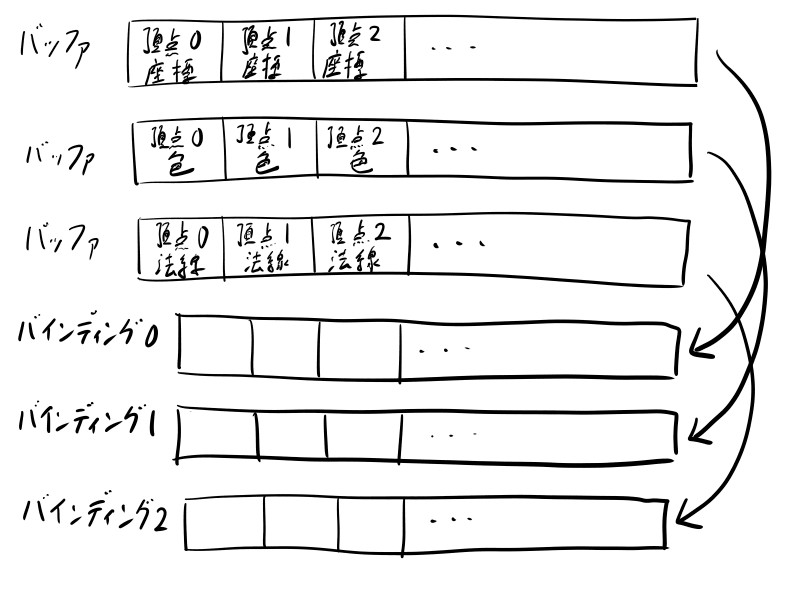
// この配列のデータをバッファvertexPosBufにコピー
std::vector<Vec3> vertices_pos = { /* ... */ }

// この配列のデータをバッファvertexColBufにコピー
std::vector<Vec3> vertices_col = { /* ... */ }

// この配列のデータをバッファvertexNormBufにコピー
std::vector<Vec3> vertices_norm = { /* ... */ }
// デスクリプション指定
vk::VertexInputBindingDescription vertexBindingDescription[3];
vertexBindingDescription[0].binding = 0;
vertexBindingDescription[0].stride = sizeof(Vec3);
vertexBindingDescription[0].inputRate = vk::VertexInputRate::eVertex;
vertexBindingDescription[1].binding = 1;
vertexBindingDescription[1].stride = sizeof(Vec3);
vertexBindingDescription[1].inputRate = vk::VertexInputRate::eVertex;
vertexBindingDescription[2].binding = 2;
vertexBindingDescription[2].stride = sizeof(Vec3);
vertexBindingDescription[2].inputRate = vk::VertexInputRate::eVertex;
vk::VertexInputAttributeDescription vertexInputDescription[3];
vertexInputDescription[0].binding = 0;
vertexInputDescription[0].location = 0;
vertexInputDescription[0].format = vk::Format::eR32G32B32Sfloat;
vertexInputDescription[0].offset = 0;
vertexInputDescription[1].binding = 1;
vertexInputDescription[1].location = 1;
vertexInputDescription[1].format = vk::Format::eR32G32B32Sfloat;
vertexInputDescription[1].offset = 0;
vertexInputDescription[2].binding = 2;
vertexInputDescription[2].location = 2;
vertexInputDescription[2].format = vk::Format::eR32G32B32Sfloat;
vertexInputDescription[2].offset = 0;
vk::PipelineVertexInputStateCreateInfo vertexInputInfo;
vertexInputInfo.vertexBindingDescriptionCount = std::size(vertexBindingDescription); // == 3
vertexInputInfo.pVertexBindingDescriptions = vertexBindingDescription;
vertexInputInfo.vertexAttributeDescriptionCount = std::size(vertexInputDescription); // == 3
vertexInputInfo.pVertexAttributeDescriptions = vertexInputDescription;// バッファのバインド
cmdBufs[0]->bindVertexBuffers(0, { vertexPosBuf.get(), vertexColBuf.get(), vertexNormBuf.get() }, { 0, 0, 0 });// シェーダでの受け取り指定
layout(location = 0) in vec3 inPos;
layout(location = 1) in vec3 inColor;
layout(location = 2) in vec3 inNormal;シェーダ以外の内容がかなり変わりました。1行ずつよく読んで理解してください。
アトリビュートデスクリプションにおけるbindingに注目しましょう。0,1,2となっており、それぞれ別のバインディングからデータを持ってくることを表しています。
またoffsetにも注意しましょう。全て0となっています。 バインディングのデータを頂点ごとに刻んだあと、どうやって取り出すかを考えれば納得できるでしょう。
補足として、バッファのバインド部分は
// バッファのバインド
cmdBufs[0]->bindVertexBuffers(0, { vertexPosBuf.get() }, { 0 });
cmdBufs[0]->bindVertexBuffers(1, { vertexColBuf.get() }, { 0 });
cmdBufs[0]->bindVertexBuffers(2, { vertexNormBuf.get() }, { 0 });
このように書いてもOKです。
またさらに
// バッファのバインド
cmdBufs[0]->bindVertexBuffers(0, { vertexPosBuf.get(), vertexColBuf.get() }, { 0, 0 });
cmdBufs[0]->bindVertexBuffers(2, { vertexNormBuf.get() }, { 0 });
このように書いても変わりません。各引数の意味を踏まえてよく読めば理解できるでしょう。
例4: 座標, 色, 法線を1つのバッファに入れ、別のバインディングとして渡す
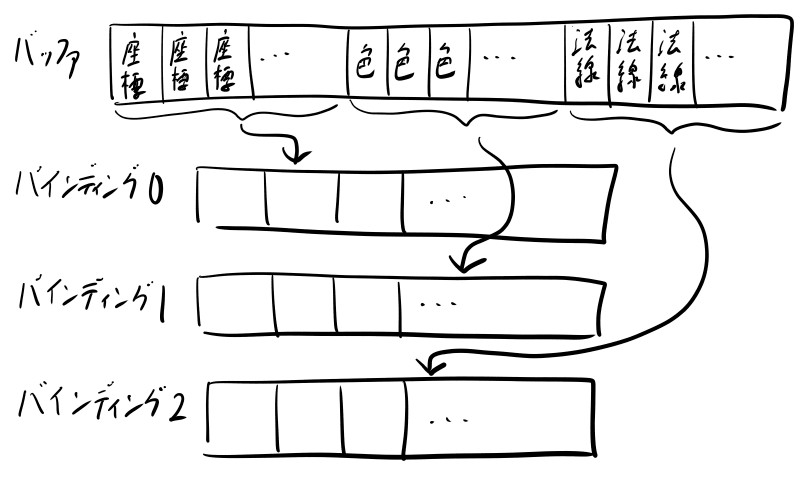
// この3つの配列のデータを並べてバッファvertexBufにコピー
std::vector<Vec3> vertices_pos = { /* ... */ }
std::vector<Vec3> vertices_col = { /* ... */ }
std::vector<Vec3> vertices_norm = { /* ... */ }
// デスクリプション指定
vk::VertexInputBindingDescription vertexBindingDescription[3];
vertexBindingDescription[0].binding = 0;
vertexBindingDescription[0].stride = sizeof(Vec3);
vertexBindingDescription[0].inputRate = vk::VertexInputRate::eVertex;
vertexBindingDescription[1].binding = 1;
vertexBindingDescription[1].stride = sizeof(Vec3);
vertexBindingDescription[1].inputRate = vk::VertexInputRate::eVertex;
vertexBindingDescription[2].binding = 2;
vertexBindingDescription[2].stride = sizeof(Vec3);
vertexBindingDescription[2].inputRate = vk::VertexInputRate::eVertex;
vk::VertexInputAttributeDescription vertexInputDescription[3];
vertexInputDescription[0].binding = 0;
vertexInputDescription[0].location = 0;
vertexInputDescription[0].format = vk::Format::eR32G32B32Sfloat;
vertexInputDescription[0].offset = 0;
vertexInputDescription[1].binding = 1;
vertexInputDescription[1].location = 1;
vertexInputDescription[1].format = vk::Format::eR32G32B32Sfloat;
vertexInputDescription[1].offset = 0;
vertexInputDescription[2].binding = 2;
vertexInputDescription[2].location = 2;
vertexInputDescription[2].format = vk::Format::eR32G32B32Sfloat;
vertexInputDescription[2].offset = 0;
vk::PipelineVertexInputStateCreateInfo vertexInputInfo;
vertexInputInfo.vertexBindingDescriptionCount = std::size(vertexBindingDescription); // == 3
vertexInputInfo.pVertexBindingDescriptions = vertexBindingDescription;
vertexInputInfo.vertexAttributeDescriptionCount = std::size(vertexInputDescription); // == 3
vertexInputInfo.pVertexAttributeDescriptions = vertexInputDescription;// バッファのバインド
cmdBufs[0]->bindVertexBuffers(0, { vertexBuf.get(), vertexBuf.get(), vertexBuf.get() },
{ 0, vertices_pos.size() * sizeof(Vec3), vertices_pos.size() * sizeof(Vec3) + vertices_col.size() * sizeof(Vec3) });// シェーダでの受け取り指定
layout(location = 0) in vec3 inPos;
layout(location = 1) in vec3 inColor;
layout(location = 2) in vec3 inNormal;デスクリプションの指定は例3と変わっていないことに注意しましょう。変わったのはバッファへのデータの入れ方、そしてバッファのバインド部分です。bindVertexBuffersの第3引数に注目してください。
1バインディング=1バッファという制限は特にないのです。このように、同じバッファの違うデータ領域を別のバインディングとして割り当てるといったことは普通に可能です。
頂点シェーダへのデータの渡し方は十分に理解できましたでしょうか。実際に渡したデータを役立ててみないとピンときづらいかもしれません。
この先の節で実際に色などのデータを渡して役立てるので、それで理解が不足していると感じたらまた読み直しにくるとよいでしょう。
公開:
最終更新: